This is a dump of Linux fundamentals with my own example of using Nuxt.js, Pocketbase (a wrapper for SQLite) with Nginx.
Where is Linux used?
I use Debian. Who else uses it? The International Space Station (ISS).
SpaceX’s Falcon 9 and Dragon uses Linux. Tesla’s Autopilot system uses Linux. Most of the world’s supercomputers run on Linux, including Debian and it’s derivatives. CERN uses Linux. The US Department of Defense uss Linux. Google uses Linux.
Everywhere. The majority of servers including VPS run on Linux. The open-source nature of Linux allows you to modify and tweak the software for specific tasks not just use it generally as an operating system.
Booting up
There are few ways to use Linux, here are the major use cases.
You can boot Linux from a USB and use it from there without affecting your existing OS. This is a nice way to test a Linux distro.
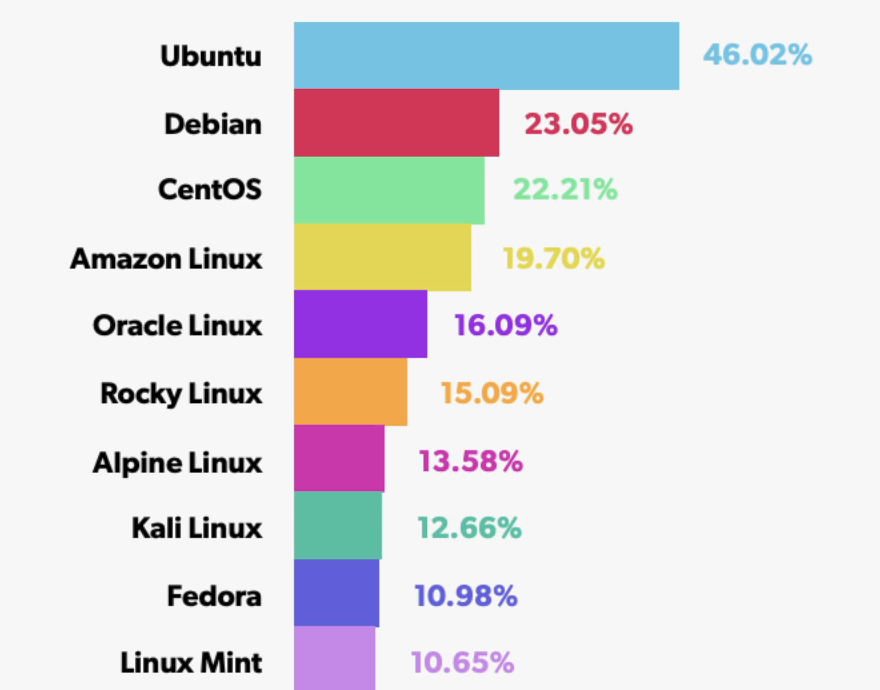
There are tons of different Linux types or “distributions”.
For example, Tails is used only in memory and was used by Edward Snowden to talk to journalists without leaving a digital paper trail.
Once you’ve got a system, you can install it as a dual boot system, allowing you to pick which OS you’d like to use.
You can boot up Linux on a Raspberry Pi; it has its own distro, in fact.
You can also boot up Linux as a Virtual Machine using software like VirtualBox or VMware. These can boot up a guest OS, and like the USB method, it’s a way to test distros.
You can use virtualization to run Linux in the cloud.
If you’re on Windows, the best way is to use Windows Subsystem for Linux (WSL) without doing the dual boot tactic. This works really well with VSCode. You can do your development work with WSL.
Linux on a Virtual Private Server
VPS uses Linux in the cloud by creating a virtual machine instance, such as on Linode, running an operating system like Ubuntu. This allows you to have a dedicated environment with full control over the OS, software, and configurations, similar to having a physical server but with the flexibility and scalability of cloud infrastructure.
Distros
Here are 10 Linux distros to consider:
-
Linux Mint: Best for everyday desktop use.
-
Alpine Linux: Ideal for blazingly fast server setups.
-
Kali Linux: Tailored for ethical hacking and security testing.
-
Ubuntu: General-purpose, user-friendly, and widely supported.
-
Manjaro: Arch-based, great for advanced desktop users.
-
Red Hat: Enterprise-level stability with professional support.
-
Tails: Privacy-focused, runs from a USB for anonymity.
-
Debian: Stable and secure, great for both servers and desktops.
-
Pop!_OS: Ubuntu-based, optimized for developers and gaming.
-
OpenSUSE: Powerful for both desktop and server environments.
If you’re a beginner, Ubuntu is a great. In fact there are many engineers who continue to use Ubuntu because of the simplicity.
10 essential commands
ls (list): List files sorted by size and print the size.
ls -sS (shows file size in bytes)
Run ls --help for more options.
cd: Move to the previous directory.
cd - or cd ..
pwd: Print the current working directory.
pwd
echo: Print a value.
echo "Hi there!"
mkdir: Create a deeply nested directory.
mkdir -p new_directory/subdirectory
touch: Create a new file.
touch diary.txt
rm: Remove a file or directory.
rm diary.txt
rm -rf directory_to_remove # use carefully
cat: Read a file.
cat diary.txt
cat diary.js -n (shows line numbers)
cp: Copy a file or directory recursively.
cp -r source_dir destination_dir
mv: Move or rename a file.
mv diary.txt useless-ramblings.txt
mv main.js ../file
mv main.js index.js ../ (moves to parent directory)
Linux File System Structure
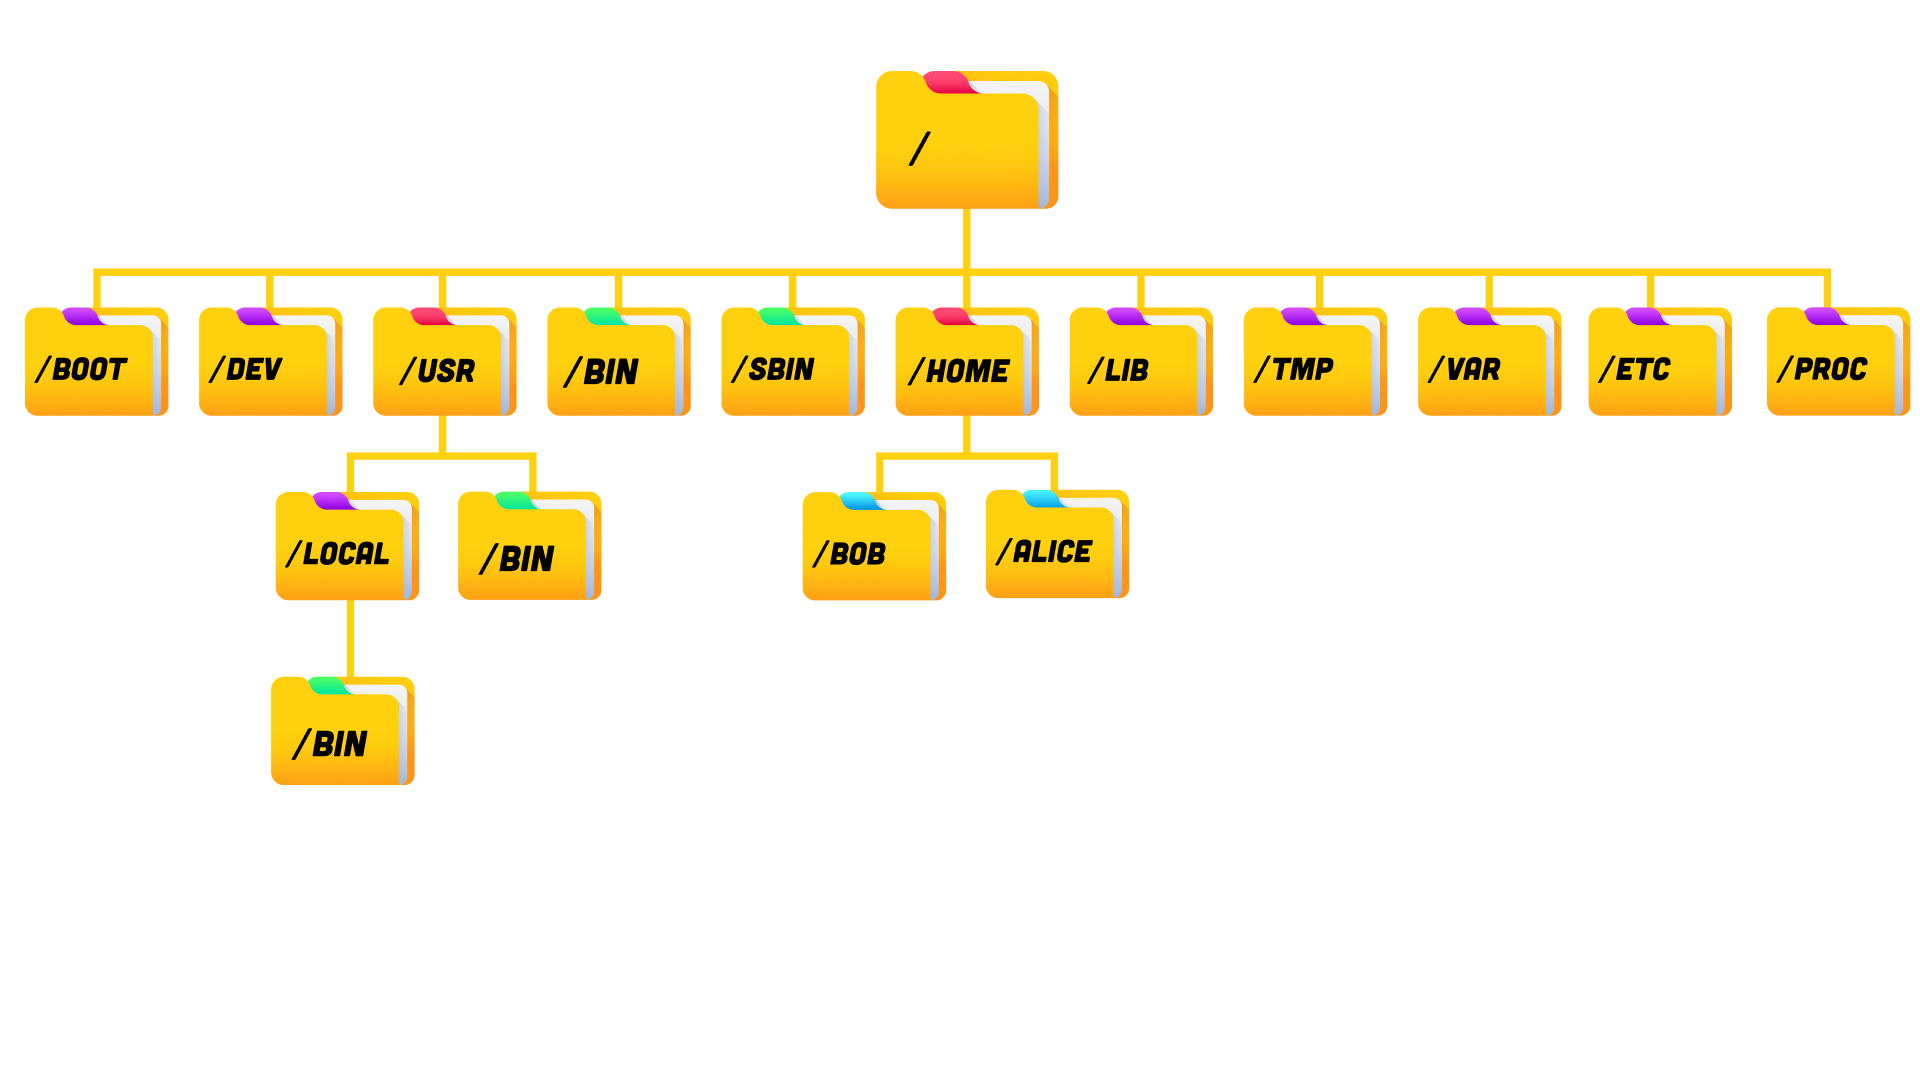
/ (root): The primary hierarchy for the entire file system.
/boot Contains files needed to boot the system.
/dev: Contains device files that represent hardware components. /dev
/usr: Contains user-related programs and data. /usr
/bin: Contains essential user binaries (commands). /bin
/sbin: Contains essential system binaries (commands). /sbin
/home: Contains home directories for users. /home
/lib: Contains essential shared libraries for system binaries. /lib
/tmp: Contains temporary files. /tmp
/var: Contains variable data like logs and caches. /var
/etc: Contains system-wide configuration files. /etc
/proc: Contains virtual files that represent system and process information. /proc
/usr/local: Contains user-installed software. /usr/local
/home/bob and /home/alice: Home directories for users Bob and Alice. /home/bob /home/alice
How Binaries are mapped on Linux Systems
Use the which command to find the path to a binary.
command line which ls shows /usr/bin/ls - this shows you used ls here, that’s the code linux executes
type in this:
echo $PATH
use export PATH in your bash editor to tell the Linux system which binaries it should execute, for examples, if oyu have docker installed in two places, tell it to execute the one you want
File Permissions
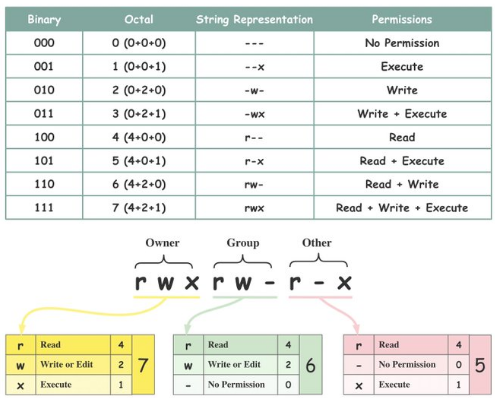
What is rwx!? Read, Write and Execute.
-rw-r--r-- 1 joehax 0 Nov 27 06:30 README.md
rwxrwxrwx or rwx rwx rwx
USER/OWNER = RWX (first three)
GROUP = RWX
OTHER = RWX
Permissions are like this:
rwx rwx rwx
If there’s a dash, it means permission is not granted. If we wanted to take away execution privileges from others, we would remove the x from others and replace it with a dash:
rwx rwx rw-
If others should have no access at all, it would be three dashes:
rwx rwx ---
But how do we change permissions?
chmod changes file permissions.
We can use it with chmod g+w foo.txt.
This means give group write access to foo.txt.
The complete format looks like this:

[u/g/o] = user, group, other
[+/-/=] = add, remove, set
[r/w/x] = you know already
[file] = the targeted file
There’s another way to write this though, which is octal permissions.
For example:
664 to [u/g/o]. 6 means read and write, and 4 means write only.
Use the Chmod calculator here: https://chmod-calculator.com/
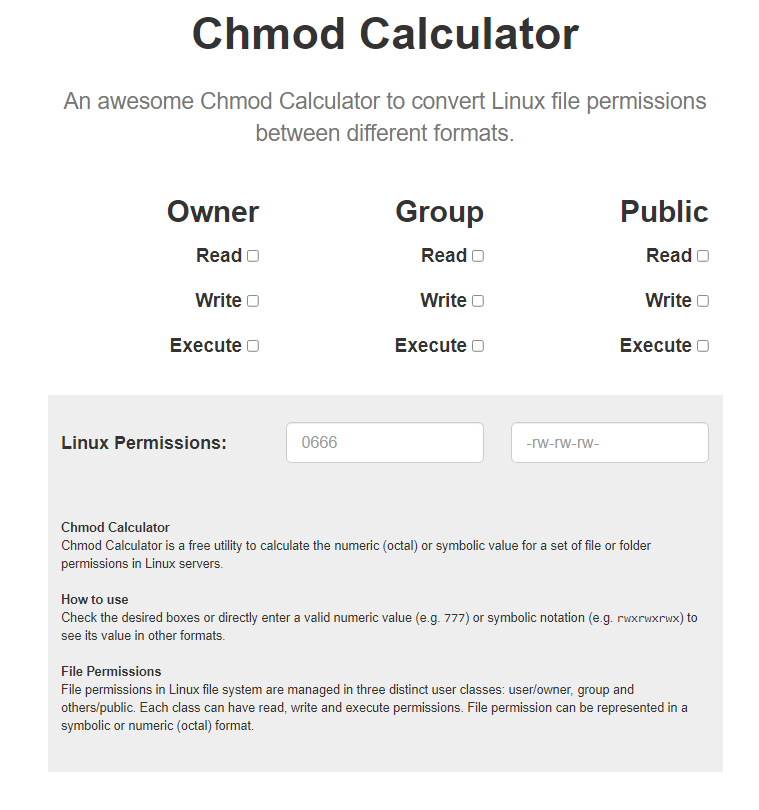
Be careful though, some people get into the habit of putting 777, basically giving everything full read and write for every group and user. This isn’t good security, always follow the principle of least privilege.
Add write access to a group:
chmod g+w somefile.txt
Remove write access to a group:
chmod g-w somefile.txt
Add a specific file permission config, like readonly:
chmod g=r somefile.txt
Update file permissions with octal notation:
chmod 644 somefile.txt
Sudo command
SuperUserDo or Root is a special user account with User ID: 0.
It has full admin permissions for you to tap into on the system. It can perform any task, access any file, and modify any system configuration.
Change a file’s owner:
chown other_user somefile.txt
Change the owner of a file to root:
chown root somefile.txt
Execute a command with root privileges:
sudo chown root somefile.txt
Finding locations
which systemctl
This command locates the path of the systemctl executable file in your system. It helps you verify if systemctl is installed and where it is located.
Sudoers
The /sudoers file controls the sudo permissions for users and groups. It’s crucial to edit this file using visudo to prevent syntax errors.
To allow a user to run specific commands with sudo, you can add an entry in the sudoers file:
sudo visudo
Add the following line to allow the user username to run only specific commands:
bob can restart apache2 without a password
bob ALL=(ALL) NOPASSWD: /usr/bin/systemctl restart apache2
bob can run apt-get update without a password
bob ALL=(ALL) NOPASSWD: /usr/bin/apt-get update
bob can run apt-get upgrade without a password
bob ALL=(ALL) NOPASSWD: /usr/bin/apt-get upgrade
Self-hosted Production Servers
On your actual servers, you will use SSH Auth, not password access (always remove password access). We’re human, predictable animals, and you must use SSH for production servers. You MUST disable password auth entirely because if a hacker ever got a hold of your password, you’re in big trouble.
You can give sudo to multiple users, but it’s better to follow the principle of least privilege and only grant it when necessary.
Managing Filesystem Permissions
In addition to basic file permissions using chmod and chown, you can implement more advanced permission settings. For instance, using the sticky bit ensures that only the file’s owner can delete or modify a file in a shared directory, while setfacl allows for fine-grained control over file access by setting Access Control Lists (ACLs).
Set sticky bit on a directory, so only file owners can delete their files
chmod +t /shared/directory
Use setfacl to grant a specific user write access to a file
setfacl -m u:username:w /path/to/file
Bash Shell
A shell provides an abstraction layer between the user and the operating system.
The most common shell is Bash, which stands for Bourne-Again Shell.
Zsh (Z shell) is the default on MacOS.
There’s also Fish (Friendly Interactive Shell), which is another good option.
Bash is an interpreted programming language you can use to write scripts, which is excellent for automating jobs on your machine.
Bash Script Example
app.sh
#!/bin/bash
Define variables
name=”Joe” age=26
Print a message
echo “Hello, $name!”
Read user input for age
echo “Enter your age:” read age
Conditional statement to check variables
if [ $age -ge 18 ]; then echo “You are an adult. Access granted.” else echo “You are a minor. Access denied.” fi
Loop through numbers 1 to 5
for i in {1..5}; do echo “Number: $i” done
Function to greet a person
greet() { local greeting=”Hello, $1!” echo $greeting }
Call the greet function
greet “Alice”
Read user input for favorite color
echo “Enter your favorite color:” read color echo “Your favorite color is: $color”
Check the exit status of a command
ls /non/existent/directory if [ $? -eq 0 ]; then echo “Command succeeded.” else echo “Command failed.” fi
BASH Config
In the Linux home directory, you will have two hidden files:
~/.bashrc~/.bash_profile
They’re both configuration files, but the key difference is when they are actually used:
~/.bashrcruns every time a new shell is opened.~/.bash_profileruns only on login, and only once.
These bash configurations can get more complex, but that’s the main distinction between those two files.
Common Bash Prompt Codes:
\u- Username\h- Hostname\w- Working directory
Favorite prompt
PS1='\[\e[01;35m\]\W\[\e[m\] ❯ '
Minimal
PS1='\u:\W $ '
Minimal with git branch
PS1='\W$(__git_ps1 " (%s)") $ '
Two line prompt with git branch
PS1='\n\[\033[01;32m\]\u@\h\[\033[00m\] \[\033[01;34m\]\w\[\033[00m\] $(__git_ps1 "(%s)")\n\$ '
Colorful prompt
PS1='\[\033[01;32m\]\u\[\033[00m\]@\[\033[01;36m\]\h\[\033[00m\] \[\033[01;34m\]\w\[\033[00m\] \[\033[01;33m\][\t]\[\033[00m\] \[\033[01;31m\]$(if [[ $? == 0 ]]; then echo "✓"; else echo "✗"; fi)\[\033[00m\]\n\$ '
Retro Style
PS1='\[\033[01;32m\][\[\033[01;36m\]\u\[\033[01;32m\]@\[\033[01;36m\]\h\[\033[01;32m\]] \[\033[01;34m\]\w\[\033[00m\] \$ '
Customized based on time of day with emojis
PS1='$(if [ $(date +%H) -lt 12 ]; then echo "🌅"; elif [ $(date +%H) -lt 18 ]; then echo "☀️"; else echo "🌙"; fi) \[\033[01;32m\]\u\[\033[00m\] in \[\033[01;34m\]\w\[\033[00m\] \$ '
Use source ~/.bashrc to update your bash config.
Text Editor
Nano or Vim or Neovim or . code.
Nano is minimal. Press CTRL+G for help.
Vim is robust and powerful.
They’re both used for servers, no GUI is necessary.
Neovim is Vim but has a learning curve.
. code is for VSCode which won’t work until you are using a GUI.
Grep, Sed & Awk
Grep means Global Regular Expression Print
It is used to find text patterns in files.
It has many different use cases.
Use grep to find a search term in a file.
Searching for Text with Grep Search through a single file:
command line grep “hello” file.txt
command line grep -n “hello” file.txt (line number)
Search through a directory recursively (all the files and you can add the -n too):
command line grep -r “hello” . Edit text with Sed Run a find and replace operation with sed:
command line sed ‘s/mom/dad’ file.txt
Grep is great for finding errors in your log files. If a error has occured you can use grep to search for it and see how many times it occured.
grep -c NullPointerException SomeErrorLog.txt
-c the c flag counts how many times the error has occured.
Sed
Sed is a stream editor, like nano or vscode, but it is non -interactive.
Edit text with Sed Run a find and replace operation with sed:
command line sed ‘s/duck/bread’ file.txt
Search like a regex, it will replaces every duck with bread
The s stands for substition.
It doesn’t override the original file by doing this
command line sed ‘s/duck/bread’ file.txt > file2.txt
Awk for Text Processing
While tools like grep and sed are great for finding and replacing text, awk is a powerful tool for processing text and analyzing structured data like log files. For instance, it can extract specific columns of data from system logs or CSV files, which can be useful for monitoring or auditing your VPS for potential issues.
Print the first and third columns from a log file
awk '{print $1, $3}' /var/log/syslog
Filter log lines that match a specific pattern and print the second column
awk '/error/ {print $2}' /var/log/app.log
Process Management
Use ps
PID = Process ID TTY = Terminal to this command
ps -ef
Shows you all the processes on your system, with additional resources. Extremely useful for debugging things on your sever.
Kill PID (ProcessID) e.g. Node process or a MySQL process
If it doesn’t close, use the kill -9 which is the kill signal, a forceful options
Managing Processes in Linux
List current processes:
command line ps
ps -ef
Kill a process:
command line kill PID # SIGTERM kill -9 PID # SIGKILL
Use htop for a fully interactive process management experience:
command line htop
htop is better filtiner and sotring for monitoring resources ony our linux machine. It has more customixieition for colur cscheme.
It ahs a tree form to show you how processes are connected, like SQL ids to tables.
It’s good to see which are using most reosuces in your memorny.
Use ping website.com to ping apwebsite and see the process, and shut it down, with the ckill command dierectly in htop.
Cron jobs
Know you know hot kill proceesses, let’s create a process on a schedule.
Cron is a work scheduler to run jobs int he background to run at a specific time.
Like you may want to backup your database every day at 2am.
Or maybe you want to delete all your log files every week.
Or maybe you want to send yourself a happy birthday email on a specific date.
Cron is the tool that makes that possible.
Cron syntax.
Use crontab guru to monitor tabs.

Use https://crontab.guru/ to get cron easier.
Now you can have a job that does something every tuesday for example.
How do you take advantage of this in Linux?
Well you do it with the crontab
The first thing to do is create a bash script:
How to Start a Cron Job in Linux
Create a basic bash script to run in the background:
command line nano hello.sh
echo “hello world!”
realpath hello.sh # get the full path of the file
Start the cron service and edit the crontab file:
command line sudo service cron start
Use the crontab -e (e for edit) crontab -e
Edit the crontab file with the path to your bash script:
-
-
-
-
- /mnt/d/apps/linux-playground/hello.sh
-
-
-
Five stars executes the job every minute and then add the path to the bash script
Type in realpath ./hello.sh to find the path easily, get full path to there
Now we need to run the cron service
You need root privilddege to run
How do you know the cron tab is even working?
Type in crontab -l
This tests that the cronjob is successfully registered but also make sure by doing this below:
sudo
Verify that the cron job is running:
command line crontab -l
sudo grep CRON /var/log/syslog sudo grep CRON /var/log/cron
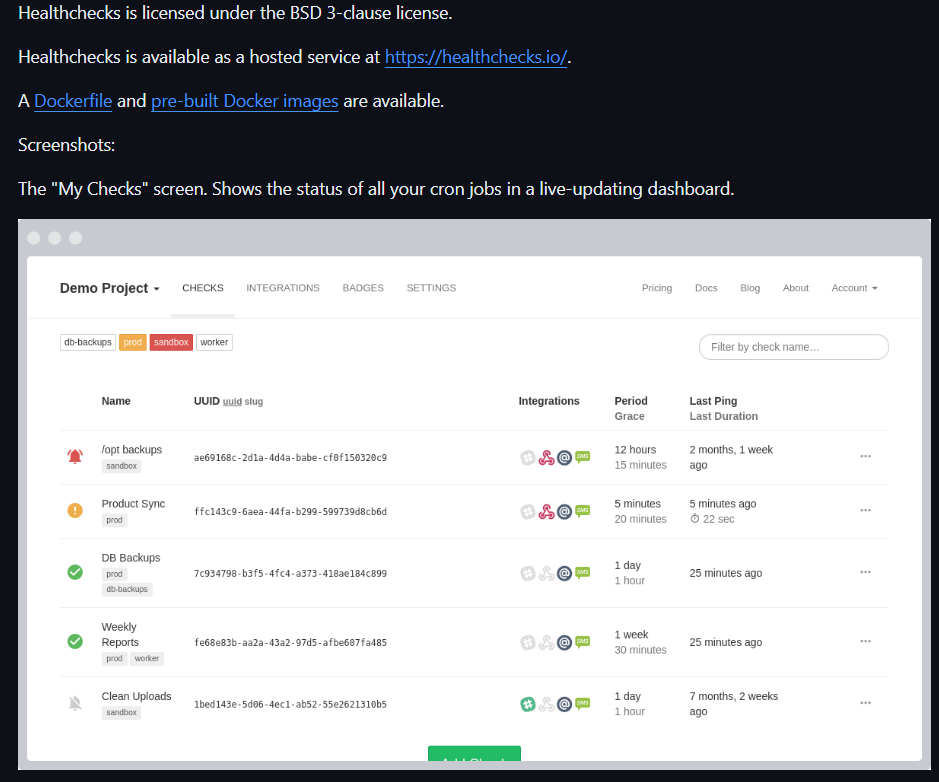
If you have a lot of cron jobs use healthchecks to monitor them successfully.
https://github.com/healthchecks/healthchecks
Quick automation cron jobs
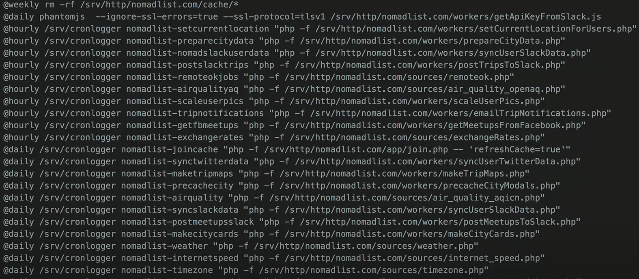
es, you can definitely use @daily in your cron jobs. The @daily keyword is a shorthand for setting up a cron job to run once a day at midnight. It’s equivalent to writing 0 0 * * *.
Here are some useful cron job shortcuts:
@hourly: Runs once an hour, equivalent to 0 * * * *. @daily: Runs once a day at midnight, equivalent to 0 0 * * *. @weekly: Runs once a week at midnight on Sunday, equivalent to 0 0 * * 0. @monthly: Runs once a month at midnight on the first day of the month, equivalent to 0 0 1 * *. @yearly or @annually: Runs once a year at midnight on the first day of January, equivalent to 0 0 1 1 *.
Example from levelsio:
Tar & Gzip
One of the biggest problems with computers is that space is limited, and that’s true most of all int he cloud.
The more space you use, the more you pay, simple.
Thefore, we should compress, and shorten things.
Luckily computers scientists have created various algorithms and file compression formats to make things smaller
One of the most famous algorithms is LZ77 which is the basis for Gzip.
It reduces the file size without losing any information, also known as Lossless.
ls -lh
This gives you the size of a file in a human readabler format.
Compress with Gzip
command line gzip somefile.txt
ls -lh the file size will be reduced dramatically
How can you get the file back?
gzip -d somefile.txt.gz
-d the d flag means decompress
But what if you want to compress/archive entire folders of data?
Tar, can pass directories as if it was a file
Flags to know for Tar
-c means create -v verbose to list out what it’s archiving -f means file name
-cvf
Archive with Tar command line tar -cvf archive.tar /path/to/dir
tar -czvf archive.tar.gz /path/to/dir
tar -xzf archive.tar.gz
When you run the command first you get a new file, contains all the original files but they aren’t compressed Tar use gz
.gz is the file extension for gzip
Tar compression algorithms options: -z gzip compression -J gz compression -j bzip2 compression
For ismple use cases use gzip
Package Managers
Install methods
Advance way is installing from source
The other way is package manager
Install from Source Apex-alpha-giga-chad Linux users prefer to install from source:
command line git clone https://github.com/mtoyoda/sl.git cd sl
make ./sl
Move binary to /usr/local/bin
sudo mv ./sl /usr/local/bin
Install from Compiled Binary command line wget https://path-to-some/package.deb sudo dpkg -i package.deb
Install with Package Manager command line sudo apt update sudo apt install sl
Package managers have .deb files or .rpm on red hat
A utility like wget, and use another utility like dpkg, or use apt
SSH
Secure shell, or SSH
A way to connect to a remote comptuer and use the server terminal.
Connect your your VPS ssh root@your.ip.address Create an SSH Key Use an SSH key to access your server without needing to enter the root password.
ssh-keygen -t ed25519 -C “your_email@example.com”
Make a note of the username and pwd, and IP address
Build an app on a VPS
Nuxt.js - frontend
npm run dev for nuxt.js
Pocketbase app - backend
./pocketbase serve
Customize all the settings itself
All the data for pocketbase is stored in the pb_data directory
How do we get this on the server and present it to our end users on the internet?
Firewall
Port Reference for this Project The following ports are opened for external use:
80 HTTP CLOSED BY DEFAULT BUT OPEN FOR WEB APPS 443 HTTPS CLOSED BY DEFAULT BUT OPEN FOR WEB APPS 22 SSH OPEN TO YOUR VPS These ports are only used internally, i.e by localhost:
3000 Nuxt.js 8090 Pocketbase
Setup Nginx apt update apt install nginx systemctl start nginx systemctl enable nginx systemctl status nginx
Uncomplicated Firewall
ufw status sudo ufw app list ufw allow ‘Nginx Full’ enable 80 and 443
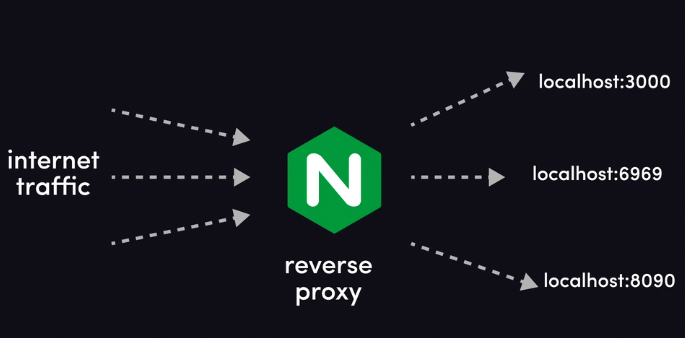
Nginx is a reverse proxy that sits betewen your nuxt.js and pocketbase
sudo apt install nginx
systemctl start nginx
systemctl enable nginx - always running int he background as a process
systecmtl status nginx
Code Transfer on VPS
So don’t put your entire github project on your directory for your app
Instead put the build folder which is the
npm run build ok?
you can also use filezilla or secure copy from your local machine to your VPS

Install Node.js In order to run the app, we will need Node.js installed in the VPS.
| curl -o- https://raw.githubusercontent.com/nvm-sh/nvm/v0.39.7/install.sh | bash |
nvm install 20 Git Clone to VPS Note: If using your own code, you will first need to push your code to a remote repository on GitHub.
cd apps git clone https://github.com/joehax-io/linux-course guestbook
cd guestbook
npm install npm run build
curl http://localhost:3000
In a separate terminal session, also run Pocketbase:
sudo chmod +x pocketbase ./pocketbase serve
Secure Copy
As an alternative, you can copy the raw files from your local machine to the remote machine.
scp -r /path/to/local/code root@123.45.67.89:/apps/guestbook
Check the website is running
curl http://localhost:3000
Run poocketbase binary
./bpocketbase serve you will get ./pcoketbase permission denined
you need to give right perms
chmod +x pocketbaes
How do we access it int he browser though?
SSL
There’s many ways to get SSL certicates. Certbot. Or use Cloudflare with a free DNS service which comes with free DDos protection.
You can transfer your DNS to cloudflare, create an A record that points to your IP to your VPS
Tell cloudflare to go to your cloudflare first, and then your VPS, to cache and do free ddso protection
You’ll get two values a private key and pem
Create to certicfiaates and put them in cert.pem and touch cert.pem, and do the key.pem files
Inside /etc/ssl/cert.pem and key.pem which you can use for all your applications
Go to cloudflare and go to oirigin server to genereate a new certificate and private key and certificate key

secure sockets layer
Note: This section assumes you have a domain name registered for your webapp and
Install CloudFlare SSL
First, obtain a free Origin Certificate from CloudFlare. You will need to transfer your DNS records to Cloudflare by following this guide.
nano /etc/ssl/cert.pem nano /etc/ssl/key.pem
Alternative: Let’s Encrypt If you do not want to use CloudFlare, an alternative is to use Certbot, for example:
apt-get update apt-get install certbot
certbot certonly –standalone -d example.com -d www.example.com
Nginx for Nuxt.js /build and pocketbase
Modify the Nginx Config nano /etc/nginx/sites-available/guestbook ln -s /etc/nginx/sites-available/guestbook /etc/nginx/sites-enabled/
rm /etc/nginx/sites-enabled/default
nginx -t systemctl reload nginx Nginx Config The Nginx config will redirect all HTTP traffic to HTTPS. It also serves as a reverse proxy to route traffic to either the Nuxt.js frontend or Pocketbase Admin dashboard.
Example of full Nginx config:
        server {
            listen 80;
            server_name linux.joehax.app;

            # Redirect HTTP to HTTPS
            return 301 https://$server_name$request_uri;
        }

        server {
            listen 443 ssl;
            server_name linux.joehax.app;

            # SSL configuration using Cloudflare certificates
            ssl_certificate /etc/ssl/cert.pem;
            ssl_certificate_key /etc/ssl/key.pem;

            # SSL settings (recommended for security)
            ssl_protocols TLSv1.2 TLSv1.3;
            ssl_prefer_server_ciphers on;
            ssl_ciphers ECDHE-ECDSA-AES128-GCM-SHA256:
            ECDHE-RSA-AES128-GCM-SHA256:
            ECDHE-ECDSA-AES256-GCM-SHA384:
            ECDHE-RSA-AES256-GCM-SHA384:
            ECDHE-ECDSA-CHACHA20-POLY1305:
            ECDHE-RSA-CHACHA20-POLY1305:
            DHE-RSA-AES128-GCM-SHA256:
            DHE-RSA-AES256-GCM-SHA384;

            # Nuxt.js application
            location / {
                proxy_pass http://localhost:3000;
                proxy_http_version 1.1;
                proxy_set_header Upgrade $http_upgrade;
                proxy_set_header Connection 'upgrade';
                proxy_set_header Host $host;
                proxy_cache_bypass $http_upgrade;
            }

            # PocketBase API and Admin UI
            location /pb/ {
                rewrite ^/pb(/.*)$ $1 break;
                proxy_pass http://localhost:8090;
                proxy_http_version 1.1;
                proxy_set_header Upgrade $http_upgrade;
                proxy_set_header Connection 'upgrade';
                proxy_set_header Host $host;
                proxy_cache_bypass $http_upgrade;
            }
        }
Test nginx with nginx -t
Environmental variables
Store things like database and API keys.
The many ways to configure Environment Variables in Linux
- Export This will setup an environment variable temporarily for the life of the shell session
export FOO=”bar”
- Bash Update the .bashrc or .bash_profile to set the variable before every shell session.
nano ~/.bashrc export FOO=”bar”
- System Environment Set it permanently system wide.
nano /etc/environment export FOO=”bar”
- .env Create a .env file in one of your project directories. Your application may need a library like dotenv in Node.js to read the value.
export FOO=”bar”
- Systemd
See next video for setting environment variables with Systemd.
Systemd
A major problem with our deploymnet currently is that it requires us to SSH into the VPS to manually start the nuxt.js and pokcetbase application.
Systemd comes with Linux and allows you to autoamtically restart apps on system reboot
- automatic restart
- custom logging
- set env vars
ls etc/systemd/system and see things already there
Pocketbase Service
ls /etc/systemd/system/
nano /etc/systemd/system/pocketbase.service touch /var/log/pocketbase.log chmod 644 /var/log/pocketbase.log
unit file that tells the OS what to do set details, like user and restart alaways if it crashes
you can stuomizei tanything went wrong
execstart directive tells the binary what to do to serve it
[Unit] Description=PocketBase
[Service] Type=simple User=root Group=root LimitNOFILE=4096 Restart=always RestartSec=5s StandardOutput=append:/var/log/pocketbase.log StandardError=append:/var/log/pocketbase.log ExecStart=/root/apps/guestbook/pocketbase serve –http=”127.0.0.1:8090” Environment=”NUXT=https://linux.joehax.app/pb”
[Install] WantedBy=multi-user.target
Nuxt.js Service
add in execstart for node command also environment are set here already set before running a service
nano /etc/systemd/system/nuxtjs.service [Unit] Description=Nuxt.js Application After=network.target
[Service] Type=simple User=root Group=root Restart=always RestartSec=5s WorkingDirectory=/root/apps/guestbook ExecStart=/bin/bash -c ‘source /root/.nvm/nvm.sh && /root/.nvm/versions/node/v20.15.0/bin/npm start’ Environment=”NODE_ENV=production” Environment=”NUXT_PUBLIC_POCKETBASE_URL=https://linux.joehax.app/pb”
[Install] WantedBy=multi-user.target
Run the Services
how to get things running
reload all the bkground process that makes this happen
systemctl daemon-reload
systemctl start pocketbase systemctl enable pocketbase
systemctl start nuxtjs systemctl enable nuxtjs
systemctl status pocketbase systemctl status nuxtjs
Mount a volume
The application we are hosting collects user data.
Currently the data is being stored directly on the VPS.
In fact do this, go to:
cd /apps/guestbook/pb_data# ls and see data.db log.db
which contain the data
as the database grows it might outgrow the disk using to host the OS and all the apps
Typically it is better to isolate your user data from your hosting data and OS disk
All hosting VPS providers give you volumes or block storage which you can attach and detach to your VPS
Use it exlucislve yof the database
2dollars for 100gb
How to mount a file system on your ubuntu
Mount Volumes/Block Storage
Go into your volume and format it first, and then mount it to your external storage
mount connect drive to filesystem tree
echo “/dev” add this to make sure the volume is always mounted when the system boots
lsblk mkfs.ext4 /dev/vdb mkdir -p /mnt/blockstorage/pb_data mount /dev/vdb /mnt/blockstorage chmod -R 755 /mnt/blockstorage/pb_data echo “/dev/vdb /mnt/blockstorage ext4 defaults,nofail 0 0” | sudo tee -a /etc/fstab nano /etc/systemd/system/pocketbase.service
Update this line
ExecStart=/root/apps/guestbook/pocketbase serve –http=”127.0.0.1:8090” –dir=”/mnt/blockstorage/pb_data”
sudo systemctl daemon-reload sudo systemctl restart pocketbase sudo systemctl restart nuxtjs
The Linux Checklist Extras
Checklist of considerations for VPS deployment
DDOS attack - annoying but wont scale up like vercel, outsource to Cloudflare free DNS/Dddos Caching. CDN. Database Scaling Up. Increase CPU/RAM of VPS Sending email. Deploying with Docker Coolify Logging/Monoitoring Backups. Disaster recovery plan. Ansible Deploying with SST server { # …
Without DDos protection from cloudflare you can use this, but this isn’t as good ias it iasy:
location / { # … deny 192.168.1.100; deny 10.0.0.0/8; allow all; } }
If you max out the vertical scaled VPS applications
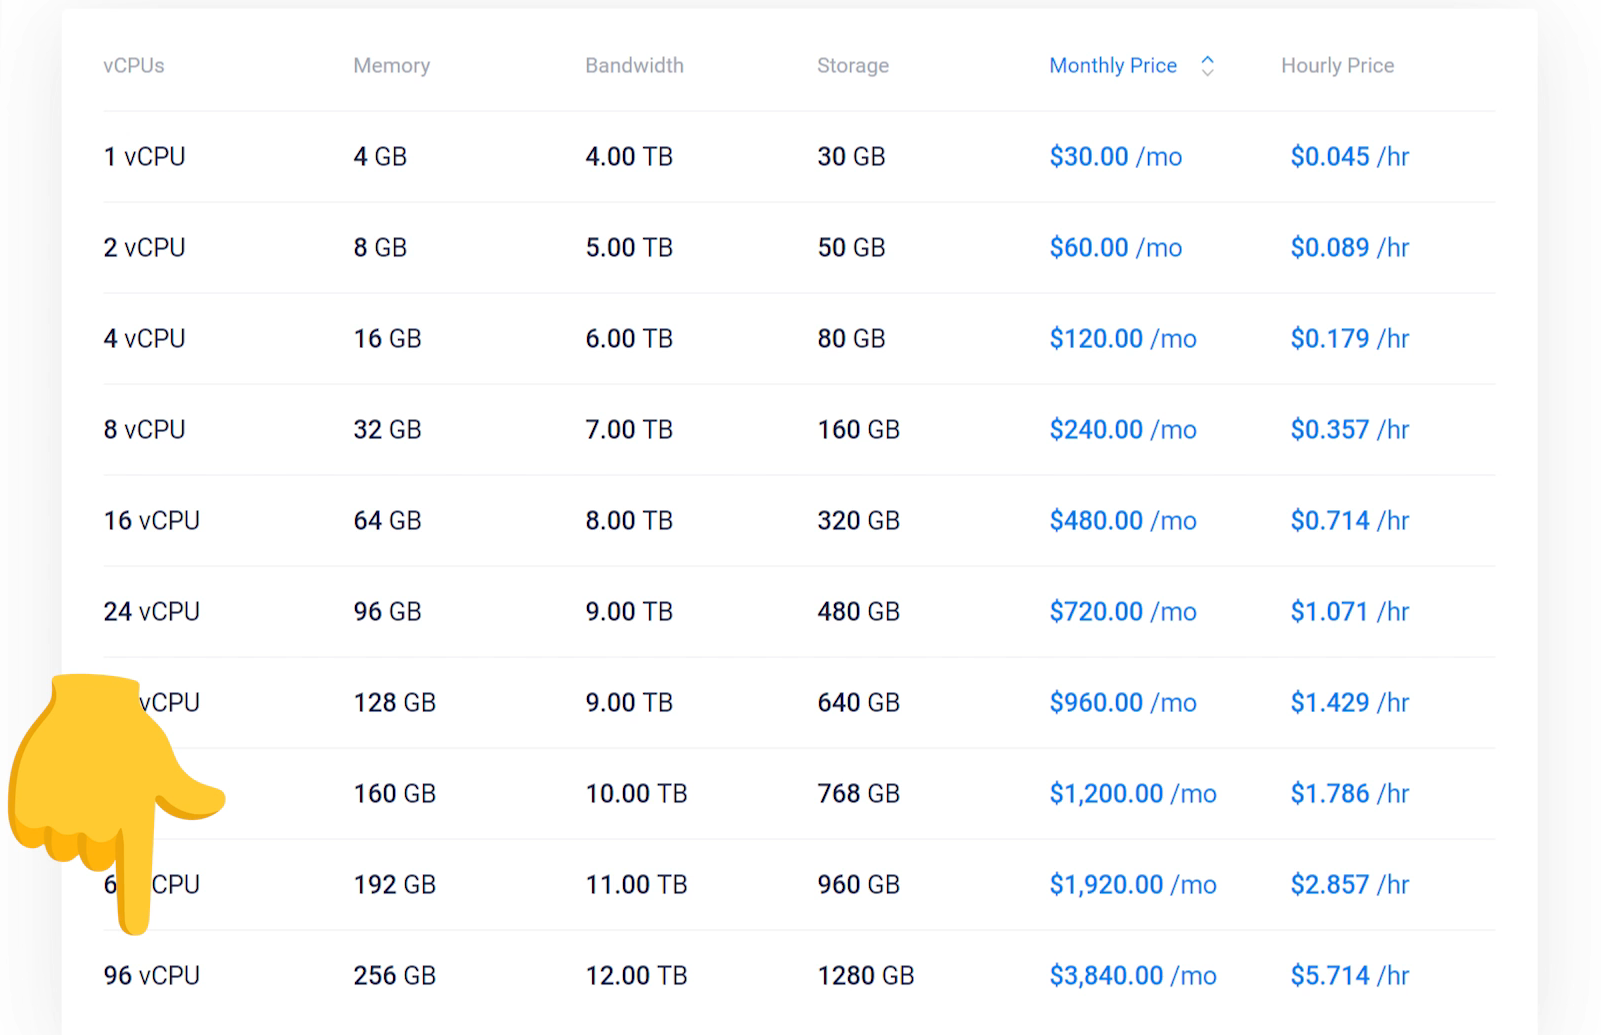
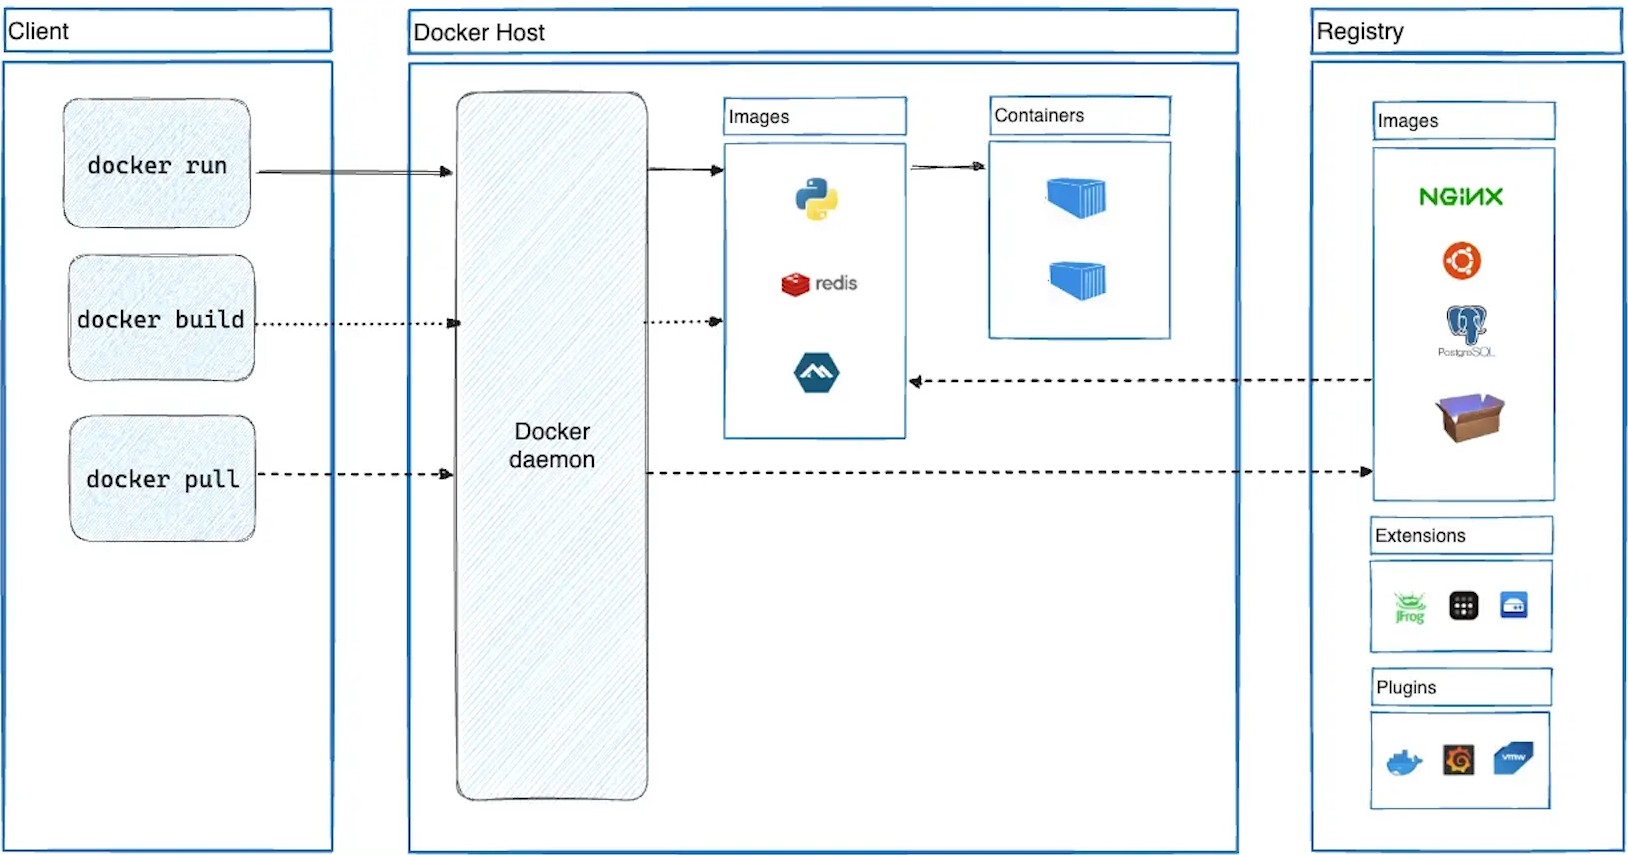
You can more to docker and then Kubanuetres for infinite scalling but this is for massive scales, the VPS will be enough
Create an Ansible .yaml file
To setup everything so you don’t have to repeat anything for new VPS.
https://www.ansible.com/
https://www.linode.com/docs/guides/deploy-linodes-using-linode-ansible-collection/
Pre-build play books
It does every command, so like bash files and settings, cronjobs, files, environment variables, nginx setup, git pulls, etc. The entire setup.
Fundamental things to know
IEEE - Posix Portable Operating System Interface
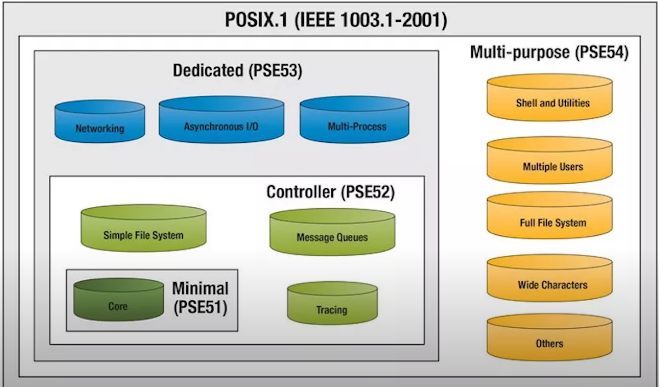
Linux is the kernal for an operating system
Written in C.
Grub GNU loads it from bootloader
The kernal is loaded into RAM
Once loaded it starts systemd
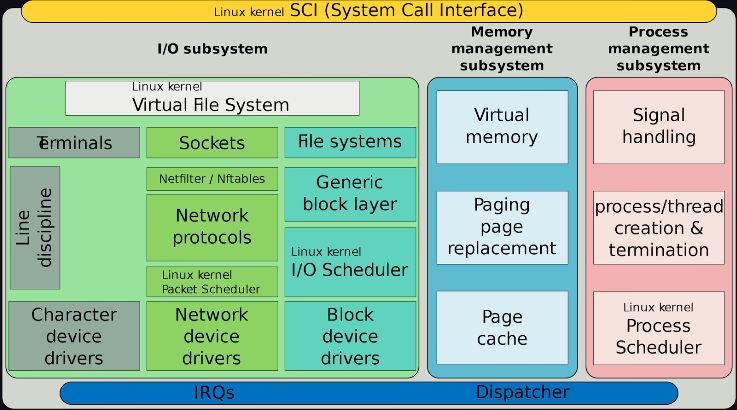
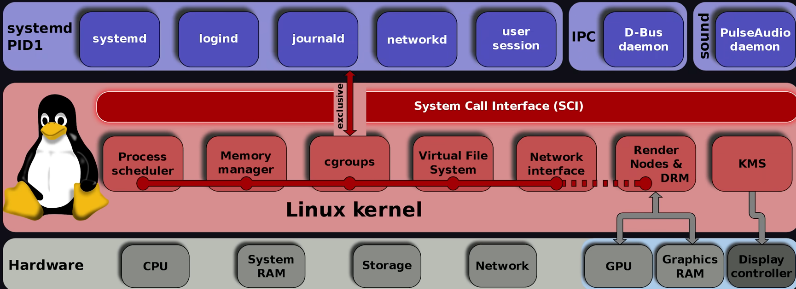
Linux Kernal Map

CPU priv
User space is you
System call is between you and the kernal
Kernal
Down here is CPU
Kernal & Drivers
System call to kernals to check permissions and manage drivers
Hostname and Network Configurations
Setting the correct hostname and configuring network settings are essential for any VPS hosting. The hostname helps identify your machine in a network, and network configurations ensure reliable access to the server.
You can easily change the system’s hostname using hostnamectl or edit network settings through tools like nmtui, which provide a user-friendly interface for adjusting IP settings and connections.
Change the system hostname in BASH.
sudo hostnamectl set-hostname myserver
Configure network settings with a text-based UI
sudo nmtui
Netcat and Nmap Usage
Netcat (nc) is a versatile tool for network communication, which can be especially helpful when testing web app connections on your VPS or transferring files between machines. Nmap is an essential tool for network scanning, which is great for analyzing open ports and services running on your server.
Listen on a port and wait for incoming connections
nc -l -p 1120
Connect to another machine on the same network and transfer file
nc other_machine_ip 1120 < file.txt
Scan the local network for active devices
nmap -sP 192.168.1.0/24
Scan all open ports on a server
nmap -p 1-65535 -sV your_vps_ip
Machine-to-Machine Communication and File Transfer Using Netcat
You can use netcat to enable communication between two machines on a local network. It’s useful for direct message transfers, file sharing, and testing connectivity.
Example of Listening on a Port
To start listening for incoming connections on a specific port (in this case, port 1120), run:
$ netcat -l -p 1120
-l: Listen mode.-p: Specify the port.
Example of Connecting from Another Machine
To connect to the listening machine (assuming its hostname is “3body”) from another machine on the same local network:
$ netcat 3body 1120
Once connected, both machines can send messages to each other, and you can even transfer files over this connection by redirecting input/output.
Network Scanning Using Nmap
nmap is a powerful tool for analyzing networks, identifying connected machines, and checking for open ports.
Scan for All Devices in a Network Subnet
To list all devices responding to a ping on your local network:
$ nmap -sP 10.0.0.0/24
Or for another network range:
$ nmap -sP 192.168.1.0/24
Full TCP Port Scan with Version Detection
To perform a full TCP scan, including service version detection, use:
$ nmap -p 1-65535 -sV -sS -T4 [target]
This command scans all ports from 1 to 65535 on the target machine.
Monitoring Network Traffic with Nethogs
nethogs is a useful tool to monitor which processes on a machine are sending and receiving the most network traffic.
Simply run:
$ sudo nethogs
It provides a real-time display of network usage per process.
Analyzing a Network with Netstat
netstat is a classic tool to report network connections. To continuously report all active network connections, run:
$ netstat -c
This provides real-time updates on all active connections.
Monitoring Tools
Monitoring your VPS’s performance is critical for maintaining optimal uptime and spotting issues before they escalate. Two common tools for monitoring are top and iotop.
top shows an overview of system usage, processes, memory, and CPU.
iotop shows disk usage and helps identify which processes are hogging I/O resources.
Monitoring logs is key to keeping an eye on the health of your system. Introduce tools like journalctl for viewing systemd logs and logrotate for managing log file sizes.
There was a funny case at a McDonalds whereby a Drive Thru screen using Linux had an error because the logs overloaded the server… Log rotation is important.
View system logs using journalctl
journalctl -xe
Configure log rotation for managing log file size
sudo nano /etc/logrotate.conf
Hostname and Network Configurations
Setting the correct hostname and configuring network settings are essential for any VPS hosting. The hostname helps identify your machine in a network, and network configurations ensure reliable access to the server.
You can easily change the system’s hostname using hostnamectl or edit network settings through tools like nmtui, which provide a user-friendly interface for adjusting IP settings and connections.
Summary of Important IP Addresses
127.0.0.1 (Loopback Address): This is the “home” address for the current machine, used when the system needs to refer to itself.
192.168.x.x: This IP range is commonly used for devices on a local network (LAN) behind a router.
10.x.x.x: A private IP range used for local networks, often in larger organizations.
These addresses are not routable on the internet and are used exclusively within local networks.
Searching for Files
To find a file by name in the current directory (including subdirectories):
$ find . -name “nameoffile*”
The . indicates the current directory, and * is a wildcard that matches similar filenames.